Metroidhat's sewing techniques and materials guide for beginners
This page is made for people who have never sewn before and wish to try making a plushie. For those who have sewing experience, you oughtta skim through this anyways before tackling one of my tutorials. I attempt to make my tutorials easy to understand with lots of pictures, and many sewing newbies have reported that they have successfully crafted a plushie from my instructions. I hope with the information provided here, you'll be able to make one too!
A general guide on fabrics
Fleece fabric is used for most of the plushies in my tutorials and I will generally use language that assumes you are using it as well. Beginning sewers might find it easier to use felt or a fleece that has very little stretch. Minky is a light fur fabric popular for plushieing, but is more suited to experienced sewers who know how to handle fabric with nap and a one-way stretch. Fur fabrics can also be used if you don't mind working with a heavier weight material. There are plenty of other cloth varieties that might be suitable for your particular project, and I encourage you to try some when you're feeling experimental.
You will notice that nearly all fabric has a 'good' side and a 'bad' side, the good side being the nicer side which you want to show on the outside of your project. When you sew pieces of fabric together, you usually put the good sides of the fabric together and sew on the bad side. That way the thread and raw edges are hidden on the bad side of the fabric. Another consequence of having good sides/bad sides is that you need to take extra care when cutting out patterns which have a mirrored symmetry. That is, when you cut out a pattern piece and require a second mirrored one, flip the paper pattern over before you cut the fabric. If you don' t do this, the bad side of one of the pieces will show up on the outside of the final result.
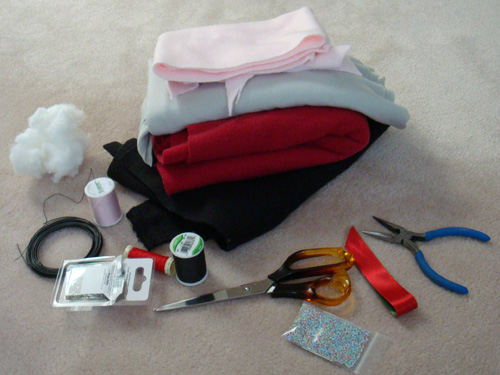
Tools
Optional stuff
Techniques
All the plushies in my tutorials can be sewn by hand or machine. I won't be doing any teaching on machine techniques, though. If you want to use your machine, you need to at least know how to make a running stitch. Anyways, here are the hand sewing techniques you'll be running into while following my tutorials.
|
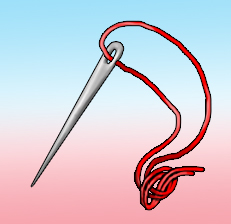
Stringing your needleCut about an arm's length of string and thread it through the eye of the needle. This is easiest to do if the end of the thread isn't frayed, and made even easier if moisten the end first. Match up the two ends of the thread and tie them in a knot with about 1 cm of tail or more remaining. Tie another knot on top of the first knot to make it thicker. You'll need the knot to be thick enough so it doesn't pass right through the cloth. |
|
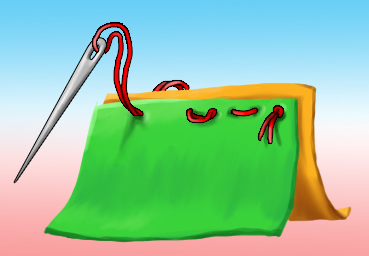
Running StitchThe running stitch, or basic stitch, or straight stitch, is used when two pieces of cloth are placed together. Simply poke the needle through both pieces of cloth and slowly pull the string taut. Don't pull too tightly though; you don't want an 'accordion' effect on your cloth. Then, on the side which the needle emerged from, poke the needle through again. Rinse and repeat. Usually, you stitch following the edge of the cloth, keeping about half a centimeter of space between the seam and the edge. The smaller you make each stitch, the better the end results will be. It will also help to poke the needle halfway through the cloth pieces, and turn it around to look at where the needle is before you pull the thread through. That will help keep your stitches even. |
|
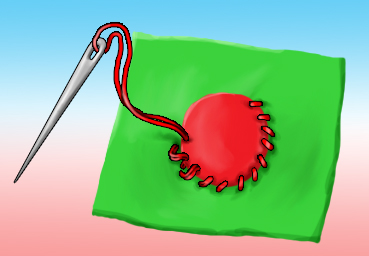
'Whipstitch'I'll call this move the 'whipstitch' (although it's technically not the whipstitch. I can't find the name for this stitch!). It is used to applique pieces of fabric directly on top of other pieces. First make sure the top piece of fabric is positioned correctly and pin it in place. Pass the needle through the bad side of the base fabric so that the knot is not visible on the good side. Also pass the needle through the edge of the top piece of cloth. Then pass the needle through your first cloth piece, but not the second one. Repeat. It's important to keep the stitches small and neat because they will be showing on the outside of the finished plush. |
|
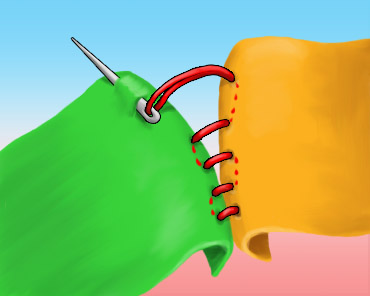
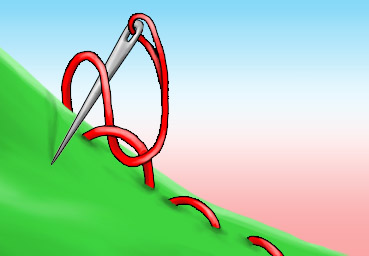
Ladder stitchIf done properly, this stitch it hides the thread within the cloth. It achieves almost the same effect as the basic stitch but instead of sewing on the inside of the plushie, you are sewing on the outside. It's perfect for sewing up openings that are used for stuffing. It is used when there are two pieces of cloth that are folded inwards, with their folds needing to be connected. First, poke your threaded and knotted needle through the bad side of one cloth, ensuring that the knot is on the inside of the plushie. Next, pass the needle partway through the good side of the other piece of cloth at the closest location where the pieces meet. Don't pull the thread too tightly; you'll need space to perform the next step. Now that the tip of your needle is on the inside of the plushie, pass it through to the outside and pull the whole needle out. Repeat. Remember to pull the earlier stitches tight at some point, once you don't need the wiggle room. |
|
Tying offWhen you finish sewing a section or run out of thread, you'll want to end the string in a knot. To do that, first find one of your previous stitches. If possible, try to choose one that is on the 'inside' of the final product so that the knot doesn't show on the outside. Now pass the needle through the stitch, but don't pull on it tightly. Pass your needle through the loop you just made, thus making a second loop. Now pull the strands of the second loop carefully, such that it shrinks the first loop, until that loop is all but gone. Pass the needle through the remaining loop and do the same thing to shrink it. Finally, you can just pull on the thread to shrink the final loop, resulting in a tight knot. Now snip off the remaining thread, leaving about 1 cm of tail. If your knot is on the 'outside' of the plushie, then you can hide the tail of the thread by poking your needle through the cloth near your knot and then taking it out at a farther location. Then snip the tail close to the cloth so that none of it is showing on the outside. |